



TL;DR:
- Silk screening, also known as screen printing, is a process that uses stencils and mesh screens to create durable, vibrant designs on fabric. The method involves multiple steps including artwork preparation, emulsion coating, exposure, washout, printing, and curing, with proper temperature control being essential for lasting results. It remains the industry standard for high-volume, long-lasting T-shirt prints and is highly valued by collectors for its authentic, tactile quality.
Silk screening — the industry’s preferred term is screen printing — is a stencil-based method that forces ink through a taut mesh onto fabric, depositing a bold, durable design directly onto a T-shirt. Modern screens use polyester mesh, not actual silk (the historical name stuck), and every flat colour in a design needs its own separate screen. The industry standard ink is plastisol, cured at around 160°C (320°F) to chemically bond with the fabric fibres. When done right, the print can outlast the shirt itself.
A few things worth knowing upfront:
- “Silk screening” and “screen printing” describe the same process — the older term persists because of its historical resonance, especially among collectors.
- Each colour = one screen. A three-colour design needs three screens, three passes, and three rounds of registration.
- Curing at the right temperature is non-negotiable. Skip it or rush it and the print cracks after washing.
For collectors hunting authentic vintage heavy metal tees, understanding screen printing is genuinely useful. The thick, slightly raised feel of an old plastisol print on a 1990s tour shirt is a direct result of this process, and it’s one of the clearest signals that what you’re holding is the real thing. Vintage Metal Store sources and grades stock with exactly this knowledge in mind.
Table of Contents
- How does the silk screen printing process actually work?
- What materials and tools do you need for T-shirt screen printing?
- Which inks work best on T-shirts, and how does curing bond them to fabric?
- What are the real advantages and disadvantages of silk screening for T-shirts?
- Silk screening vs DTG, DTF and heat transfer: which should you choose?
- What does silk screening cost in Australia, and how long does it take?
- How do you care for, remove, and preserve screen-printed T-shirts?
- Troubleshooting common screen printing problems
- Why screen prints last: an industry perspective on durability and quality
- Your first T-shirt print: a step-by-step checklist
- Key takeaways
- Why original screen prints matter: a collector’s perspective
- Useful sources and further reading
- FAQ
How does the silk screen printing process actually work?
The silk screen printing process moves through six distinct stages. Each one affects the final result, so skipping or rushing any step shows up on the finished shirt.
-
Artwork preparation. Your design needs to be separated into individual colour layers. Each layer becomes its own film positive (a high-contrast black-and-white transparency). Vector files work best; photographs require halftone conversion, where continuous tones are broken into tiny dots.
-
Coating the screen with photo emulsion. A light-sensitive emulsion is spread evenly across the mesh using a scoop coater, then dried in a dark room. This emulsion hardens when exposed to UV light, so the screen must stay away from any light source until exposure.
-
Exposure. The film positive is placed on the coated screen and exposed to a UV light source (an exposure unit or even a strong lamp). Wherever light hits the emulsion, it hardens. The area blocked by the black design on the film stays soft and water-soluble.
-
Washout. The screen goes straight to a washout station. A firm spray of water dissolves the unexposed emulsion, leaving an open stencil in the exact shape of your design. Let it dry completely before printing.
-
Registration and printing. The screen is locked into a press above a platen (a flat board) with the T-shirt loaded on top. A flood stroke pushes ink across the mesh to fill the open apertures, then a firm print stroke with a squeegee forces that ink through the mesh and onto the fabric. Multi-colour jobs require each screen to be registered precisely so the colours align.
-
Curing. The printed shirt passes through a conveyor dryer or sits under a flash unit until the ink reaches the required temperature throughout. This is where the chemistry happens.
Proper curing is not just drying — it is a chemical crosslinking process. Plastisol ink that reaches around 160°C bonds permanently to the fabric fibres. Undercured ink looks fine off the press but cracks and washes out within weeks.
Pro Tip: Run a stretch test on a cured sample before committing to a full run. Stretch the printed area firmly. If the ink cracks, it’s undercured. If it holds and snaps back, you’re good.
What materials and tools do you need for T-shirt screen printing?
Getting the right gear matters more than most beginners expect. Here’s what the silk screen printing process actually requires, and what each piece does.
Screens and mesh counts
Mesh count is the number of threads per inch, and it controls how much ink passes through.
- Lower mesh counts pass heavier ink deposits, ideal for bold graphics on dark cotton tees and specialty inks like puff or metallic.
- Mid-range mesh counts serve general-purpose T-shirt printing on light and mid-tone fabrics.
- Higher mesh counts enable fine detail, halftones, and simulated process printing, requiring thinner inks and careful registration.
Lower mesh counts pass more ink for opaque prints on dark fabrics; higher counts suit fine detail but demand thinner inks. For a classic heavy metal design with bold lettering and a skull graphic, 160 mesh is a solid starting point.
Frames
Aluminium frames are the professional standard. They hold tension better over time than timber, which warps with moisture. Pre-stretched aluminium frames are available from Australian screen printing suppliers like Permaset and through online distributors such as Ryonet Australia.
Squeegees
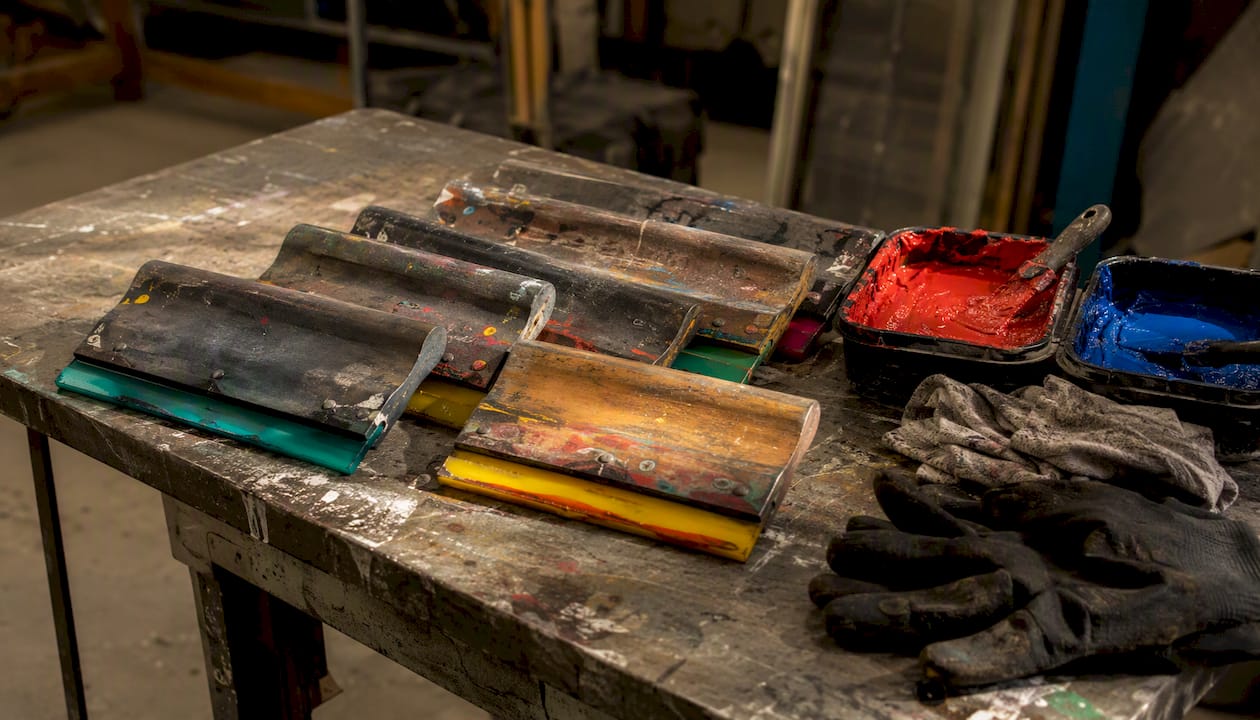
Squeegee durometer (hardness) directly affects ink deposit. A softer squeegee durometer pushes more ink through, giving a heavier, more opaque deposit. A harder durometer lays down less ink and suits fine-detail work. Professional printers calibrate ink deposit to achieve vibrancy and opacity, and squeegee choice is a big part of that calibration.
Additional equipment
| Item | What it does | Beginner option |
|---|---|---|
| Exposure unit | UV-cures emulsion onto mesh | Sunlight or UV lamp (slower) |
| Washout station | Removes unexposed emulsion | Garden hose with pressure nozzle |
| Conveyor dryer | Cures ink at consistent temp | Heat gun + flash unit (small runs) |
| Platen/press | Holds garment flat during printing | Homemade plywood board |
| Degreaser | Preps mesh before coating | Commercial screen degreaser |
| Reclaim chemicals | Strips emulsion for reuse | Emulsion remover + haze remover |
Pro Tip: In Australia, suppliers like Permaset Aqua (water-based inks), Ryonet, and local art supply shops stock beginner kits. A basic DIY entry kit typically runs from a few hundred dollars upward. Buying a pre-built starter kit is cheaper than sourcing components individually.
Which inks work best on T-shirts, and how does curing bond them to fabric?
Ink choice shapes everything: how the print feels, how long it lasts, and what fabrics it works on. There are four main types used in T-shirt screen printing.
- Plastisol: The industry workhorse. PVC-based, opaque, and extremely durable. It sits on top of the fabric rather than soaking in, giving that classic raised feel. Plastisol does not air-dry — it must be heat-cured to bond. Curing at around 160°C creates a permanent bond; undercured prints crack and fade.
- Water-based: Soaks into the fabric for a softer hand feel. Better for light-coloured shirts and eco-conscious production. Requires more careful curing and is less forgiving on dark fabrics without an underbase.
- Discharge: A reactive ink that chemically removes the dye from the fabric and replaces it with pigment. Produces an incredibly soft, almost no-hand print on dyed cotton. Only works on reactive-dyed garments.
- Specialty inks: Puff ink expands under heat for a 3D texture. Metallic and glitter inks add visual drama. Both are popular on vintage-style band tees.
Curing: the chemistry that makes it last
Curing is not simple drying. With plastisol, heat activates a fusion process where the PVC particles melt and bond to the fabric fibres. The benchmark is around 160°C throughout the ink layer, not just at the surface. A conveyor dryer gives the most consistent results because the shirt moves through a controlled heat zone at a set speed. A flash unit plus heat gun works for small DIY runs but requires careful temperature monitoring with an infrared thermometer.
Cure testing at home: Let the shirt cool, then do a stretch test (described above) and a wash test. Run the shirt through a normal machine wash and check for cracking, peeling, or colour loss. If it passes both, the cure is solid.
The tactile feel of an older plastisol print — thicker, slightly raised — versus a DTG print is one of the quickest authenticity cues for collectors. Curing temperature and ink type both determine that feel.
What are the real advantages and disadvantages of silk screening for T-shirts?
Screen printing has earned its place as the dominant T-shirt printing method for good reasons, but it’s not the right tool for every job.
Advantages:
- Durability. Screen printing scales efficiently and produces vibrant, repeatable results that hold up through hundreds of washes when properly cured.
- Colour vibrancy. The thick ink deposit produces saturated, opaque colour that digital methods struggle to match on dark fabrics.
- Cost efficiency at volume. Setup costs are spread across the run. The more shirts you print, the lower the per-unit cost.
- Tactile quality. That raised, slightly textured feel is a feature, not a flaw. Collectors actively seek it out.
- Versatility. Works on cotton, polyester blends, and most common T-shirt fabrics.
Disadvantages:
- Setup cost per colour. Each colour requires its own screen, increasing setup time and cost. A six-colour design costs significantly more to set up than a two-colour one.
- Limited photo-real detail. Photographic images require halftone conversion and precise registration. DTG handles photographic prints more easily.
- Space and safety requirements. Emulsions, inks, and reclaim chemicals need proper ventilation, storage, and disposal. Not ideal for a small apartment.
- Minimum run economics. For one or two shirts, the setup cost makes screen printing expensive per unit compared with digital alternatives.
Silk screening vs DTG, DTF and heat transfer: which should you choose?
The right printing method depends on your design, your run size, and what you want the finished shirt to feel like.
| Method | Best for | Colour vibrancy | Durability | Setup cost | Detail/photo capability | Turnaround |
|---|---|---|---|---|---|---|
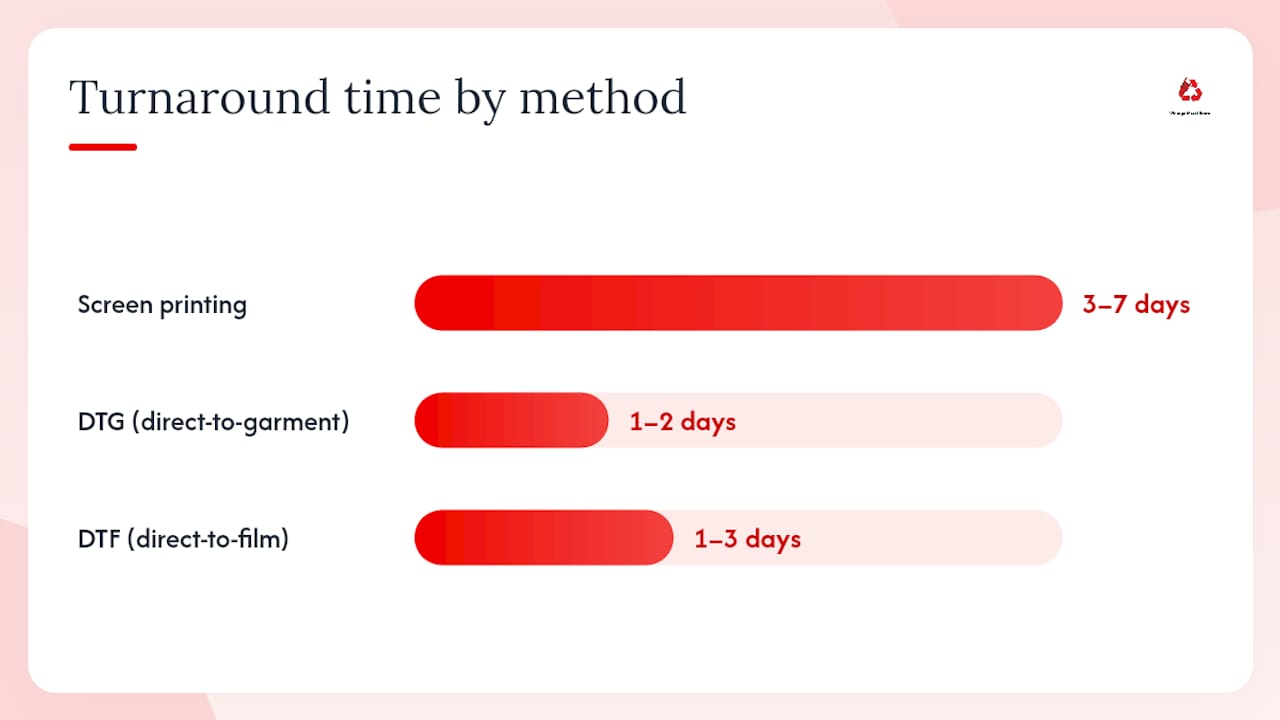
| Screen printing | Bold designs, runs of 24+ | Excellent on darks | Very high | Medium–high (per colour) | Good (halftones); limited for photos | 3–7 days |
| DTG (direct-to-garment) | Small runs, photographic prints | Good on light fabrics | Moderate | Low (no screens) | Excellent | 1–2 days |
| DTF (direct-to-film) | Short runs, complex designs | Good | Good | Low–medium | Excellent | 1–3 days |
| Heat transfer | One-offs, simple graphics | Moderate | Moderate | Very low | Moderate | Hours |
A few practical rules of thumb:
- Choose screen printing — when you need bold, opaque colour on dark shirts, you’re ordering 24 or more pieces, or you want the durability and tactile quality that collectors prize.
For collectors, the preference for authentic screen prints goes beyond aesthetics. High-quality screen printing produces saturated colour and long-lasting prints that many digital methods can’t replicate, and the print itself becomes part of the shirt’s provenance. Recognising print methods is a useful skill when spotting original vs fake band tees.
What does silk screening cost in Australia, and how long does it take?
DIY costs
Getting started with a basic home setup in Australia typically involves:
- Entry-level starter kits and equipment range in price, with costs varying depending on components and quality. Consumable costs and per-shirt printing costs depend on run size, number of colours, ink type, garment cost, and supplier. Generally, larger runs reduce the per-unit cost compared to small quantities.
Timeline
DIY: Artwork prep (1–2 hours), screen coating and drying (2–4 hours), exposure and washout (30–60 minutes), printing (1–3 hours depending on run size), curing (minutes per shirt through a dryer), wash test (24 hours). Total: 1–2 days minimum for a first run.
Professional shop: Most Australian screen printers quote 5–10 business days for standard orders, with rush options available. Artwork approval and screen setup are the longest stages.
How do you care for, remove, and preserve screen-printed T-shirts?
Washing and drying
Screen-printed shirts last longest when you treat them gently. Turn the shirt inside out before washing, use cold water on a gentle cycle, and choose a mild detergent without fabric softener. Fabric softener coats fibres and can degrade the ink bond over time. Air drying is preferable to tumble drying; if you must use a dryer, keep it on a low heat setting.
For vintage band shirts, the Vintage Metal Store care guide for collectors goes deeper on laundering frequency and storage conditions. The short version: wash less, air dry more, and store flat or on a padded hanger away from direct sunlight.
Pro Tip: For a truly rare vintage shirt, consider hand washing in cold water with a pH-neutral soap. Machine washing, even on gentle, creates friction that accelerates print wear.
Removing screen printing
Removal is possible using acetone or specialist plastisol removers, but it carries real risk. Solvents can dissolve the ink enough to thin or lift the design, but they can also damage the fabric, bleach the colour, or leave a ghost image. For a common shirt, it’s worth attempting. For a vintage or collectible tee, don’t. The print is part of the shirt’s value and history.
Preservation for collectors
For a vintage screen-printed shirt, the print condition is inseparable from the shirt’s value. A faded, cracked print on a 1992 tour tee tells a story, but a well-preserved one commands a premium. Store flat, away from humidity and UV light, and handle with clean hands.
- Store folded flat in acid-free tissue or a sealed garment bag, not on wire hangers.
- Keep away from direct sunlight, which degrades both fabric and plastisol over time.
- Avoid stacking heavy items on top of stored shirts — sustained pressure can crack older, stiffer plastisol prints.
- If a print shows early cracking, consult the restoring old band shirts workflow before attempting any DIY fix.
Troubleshooting common screen printing problems
Even experienced printers hit snags. Here are the most common problems and their fixes.
Common defects and causes:
- Misregistration (colours not aligning): Screen not locked down properly, or the garment shifted between passes. Fix: re-register screens using registration marks on the film positives; use pallet adhesive to hold the shirt firmly.
- Low ink deposit / faded print: Squeegee pressure too light, mesh count too high for the ink, or ink too thick. Fix: increase squeegee pressure, switch to a lower mesh count, or thin the ink slightly.
- Ghost images (emulsion residue after reclaiming): Ink haze left in the mesh. Fix: use a dedicated haze remover after reclaiming; degrease the screen thoroughly before recoating.
- Pinholes in the stencil: Dust on the film positive during exposure, or uneven emulsion coating. Fix: touch up small pinholes with emulsion or screen filler before printing; improve your coating environment.
- Emulsion washing out during printing: Underexposure. Fix: increase exposure time in small increments; check your UV source for consistency.
- Clogged mesh: Ink drying in the screen during a long run. Fix: flood the screen between prints; use a slower-drying ink additive in warm conditions.
- Inadequate cure (cracking after wash): Temperature too low or dwell time too short. Fix: verify with an infrared thermometer; slow the belt speed on the conveyor dryer.
How to run a simple cure and wash-fastness test
- Print a test swatch on a scrap shirt.
- Cure it as normal.
- Let it cool completely, then stretch the print firmly in both directions. No cracking = good sign.
- Wash the swatch on a normal cycle in warm water.
- Check for cracking, peeling, or significant colour loss. If it passes, your cure settings are dialled in.
Why screen prints last: an industry perspective on durability and quality
The longevity of a well-executed screen print comes down to one thing: the ink-fibre bond. High-quality screen printing produces a print that can outlast the garment fabric itself when done correctly. That’s not marketing language. It’s a physical reality. Plastisol, fully cured, fuses into the fabric structure rather than sitting on top of it as a separate layer.
“Ink deposit control — squeegee pressure, durometer, and mesh count — is what separates a print that looks great after 200 washes from one that fades after 20. Professional printers calibrate every variable deliberately.” — Dr Tee’s Design & Screen Printing
For collectors, this translates directly to what you feel when you pick up an original 1990s band shirt. The ink has weight and opacity. It doesn’t feel like a sticker or a transfer. That tactile quality is the result of deliberate ink deposit control, and it’s one of the reasons authentic screen-printed vintage tees hold their value in ways that modern reproductions rarely match.
Pro Tip: Judge print quality by feel, opacity, and edge crispness. Run your thumb across the design. A quality screen print has a slight raise and clean, sharp edges. Blurry edges or a flat, paper-thin feel are signs of a lower-quality print or a digital reproduction.
Your first T-shirt print: a step-by-step checklist
Work through this in order. Don’t skip the safety steps.
- Prepare your artwork. Separate colours into individual layers; convert to vector or high-resolution halftone. Output film positives.
- Degrease your screen. Use a commercial screen degreaser and rinse thoroughly. Let it dry completely.
- Coat the screen with emulsion. Apply in a darkroom or low-light environment. Use a scoop coater for an even layer.
- Dry the coated screen. Horizontal, emulsion-side down, in a dark, dust-free space. A fan speeds drying.
- Expose the screen. Place the film positive on the screen, emulsion side down. Expose to UV for the recommended time.
- Wash out the stencil. Rinse with water until the design area is fully open. Let it dry.
- Set up your platen. Apply pallet adhesive. Load the T-shirt flat and centred.
- Flood the screen. Push ink across the mesh with the squeegee at a low angle to fill the apertures.
- Print stroke. Apply firm, even pressure at a 45-degree angle. One clean pass is usually enough.
- Cure the print. Pass through a conveyor dryer at the correct temperature, or use a flash unit and verify with an infrared thermometer.
- Run a wash test. Wash a test shirt before committing to the full run.
- Clean and reclaim. Remove ink with a press wash, then apply emulsion remover and rinse. Use haze remover if needed.
Safety reminders: Work in a ventilated space when handling emulsions, inks, and reclaim chemicals. Wear nitrile gloves and eye protection. Dispose of chemical waste according to your local council’s guidelines.
Pro Tip: Keep a print log for every run: mesh count, emulsion brand, exposure time, squeegee durometer, ink type, and cure settings. When something goes wrong (and it will), your log tells you exactly what to adjust.
Key takeaways
Screen printing remains the gold standard for durable, vibrant T-shirt designs because the cured ink bonds physically with the fabric fibres, producing a print that holds up through years of wear.
| Point | Details |
|---|---|
| One screen per colour | Every flat colour needs a separate screen; multi-colour designs increase setup cost and time. |
| Cure at 160°C | Plastisol ink must reach around 160°C to bond permanently; undercured prints crack after washing. |
| Match method to run size | Screen printing is cost-effective for runs of 24 or more; DTG or DTF suits smaller or photo-detail jobs. |
| Mesh count shapes the result | Use 110–160 mesh for bold, opaque prints; 230–305 for fine detail and halftones. |
| Preservation protects value | For vintage tees, print condition directly affects collector value; store flat, away from UV and humidity. |
For collectors wanting to protect what they own, the collector’s guide to developer graphic tees covers laundering, storage, and handling in detail.
Why original screen prints matter: a collector’s perspective
The screen printing conversation matters to us at Vintage Metal Store because authenticity is everything in this space. When we grade a vintage tour shirt, the print condition is one of the first things we assess. An original screen print from a 1990s metal tour has a physical character that no modern reproduction can fake convincingly: the ink weight, the slight imperfections in registration, the way the plastisol has aged with the fabric. These are not flaws. They are proof.
The term “silk screening” carries historical weight that resonates with collectors precisely because it connects the shirt to an era of craft production. Every shirt we stock at Vintage Metal Store has been through that process. The knowledge of how screen printing works helps you recognise what you’re holding and understand why it’s worth preserving.
If you’re ready to own a piece of that legacy, browse our rare Metallica 1992 tour tee or explore the full vintage Metallica shirts collection for authentic screen-printed tour stock. These are the real thing.

Useful sources and further reading
For deeper technical reference on the silk screen printing process and T-shirt printing techniques:
- Screen printing — Wikipedia: solid overview of the method, history, and mesh materials.
- Screenprint — The Metropolitan Museum of Art: authoritative background on the printmaking tradition behind screen printing.
- What Is Silk Screen Printing, and How Does It Really Work? — Moda Material: practical breakdown of ink-fibre bonding and print quality.
- Vintage Metal Store Blogs: collector-focused guides on authentication, preservation, and care for vintage band shirts.
For Australian supplies and community:
FAQ
What are the disadvantages of silk screen printing?
The main drawbacks are setup cost per colour, limited photo-real detail without specialist halftone work, and the space and safety requirements for chemicals and curing equipment. Each additional colour adds a screen, increasing both cost and setup time.
Can you remove silk screening from a shirt?
Yes, using acetone or specialist plastisol removers, but removal can damage the fabric and may not fully erase the design. For vintage or collectible shirts, removal is strongly discouraged as it destroys both the print and the shirt’s value.
Which is better, silk screen or DTF?
Screen printing is better for bold, opaque designs on runs of 24 or more shirts, offering superior durability and colour vibrancy on dark fabrics. DTF (direct-to-film) suits short runs and photographic or complex multi-colour designs where screen setup costs would be prohibitive.
Is silk screening still used?
Absolutely. Screen printing remains the industry standard for bulk apparel orders due to its repeatability, durability, and vibrant colour output. For collectors, original screen-printed band shirts from past decades are among the most sought-after pieces precisely because of how well the prints have held up.
Recommended
- Step-by-step shirt authentication for heavy metal collectors – Vintage Metal Store
- Band t shirt preservation tips: 10 ways to protect your tees – Vintage Metal Store
- Preserving shirt prints guide for vintage collectors – Vintage Metal Store
- Differences in shirt fabrics: your complete guide – Vintage Metal Store


