



Pit-to-pit is the flat width across a shirt from one armpit seam to the other, measured with the garment laid flat. Double that number and you get the garment’s approximate chest circumference, then add 1 to 2 inches (2.5 to 5cm) for comfortable ease. Get this one number right and you’ll rarely guess wrong on a vintage tee again.
TL;DR:
- A 22-inch pit-to-pit measurement equates to about a 44-inch chest circumference, suitable for large-sized shirts with some ease.
- Accurate measurement requires laying the garment flat, smoothing wrinkles, and measuring from fabric edge to edge roughly one inch below the armpits.
- Vintage shirts often need adjustments for fabric type and era, as thinner fabrics or older cuts may require more ease for a comfortable fit.
- Stretch fabrics can distort measurements, so letting the fabric settle before measuring ensures more precise results.
- Comparing measurements of shirts that fit well in your wardrobe provides a reliable way to select size without relying solely on tags or conversions.
Table of Contents
- What is pit to pit measurement and how do you use it?
- Turning your pit to pit number into a size decision
- The measuring mistakes that lead to a returned shirt
- Pit to pit conversion cheat sheet
- Vintage-specific pit to pit advice from the crew who live in it
- How do you measure a jacket or dress with pit to pit instead of a shirt?
- Why stretch fabric throws your pit to pit number off
- Measuring pit to pit on a fitted tee versus a baggy vintage tour shirt
- A publisher’s note on why this number matters
- Find your next shirt with the fit already sorted
- Sources
- FAQ
What is pit to pit measurement and how do you use it?
Pit-to-pit measurement, sometimes shortened to PTP, is the industry’s answer to a problem that’s plagued clothing shoppers forever: size labels lie. A “large” from one brand fits nothing like a “large” from another, especially with vintage 1990s tour shirts that were not sized to any modern standard. PTP sidesteps all of that by giving you a hard, physical number.
Here’s an overview of how the measurement works.
What you’ll need:
- A flexible fabric tape measure (not a rigid tape from the toolbox)
- A hard flat surface, like a table or a wooden floor, not a bed or a rug
- A notepad or your phone, to record the number straight away
The method:
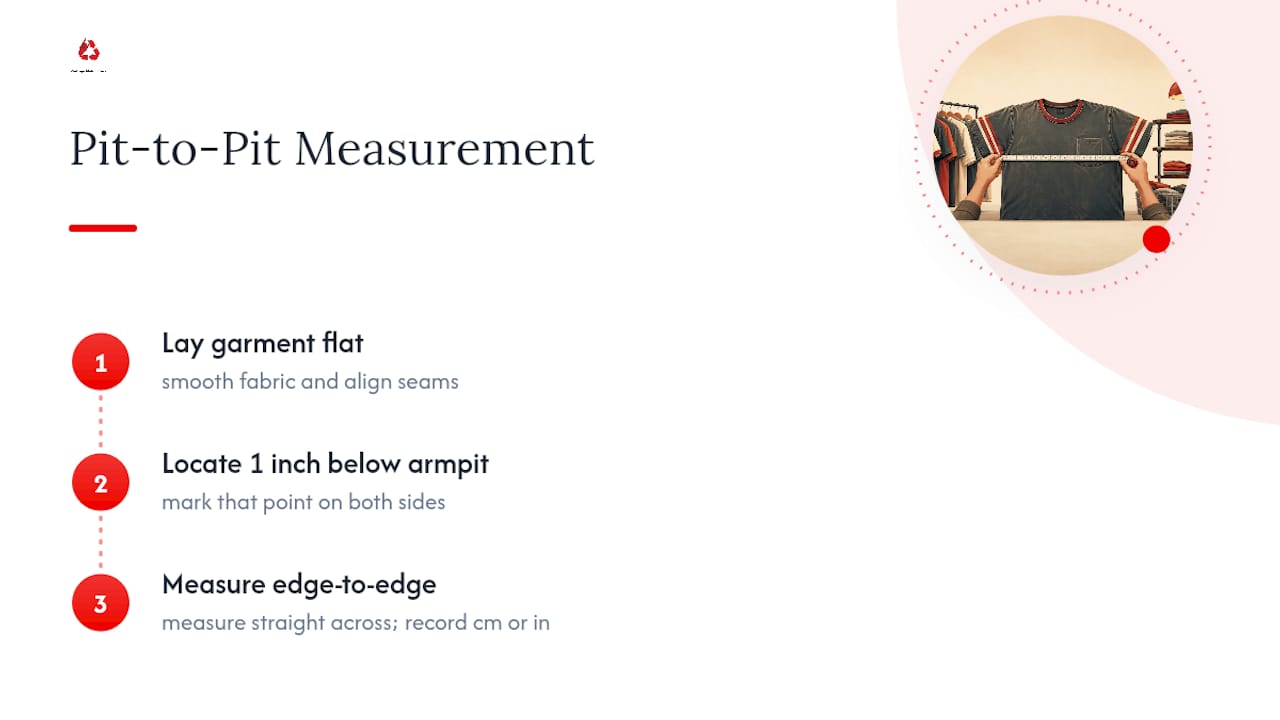
- Button or zip the shirt fully, then lay it face up on your flat surface.
- Smooth out every wrinkle and fold with your hand so the fabric sits flush.
- Line the armpit seams up so both sides of the garment are even, not twisted.
- Position your tape roughly 1 inch (2.5cm) below where the sleeve meets the body. This spot is the accepted standard because it avoids the distortion you get from measuring right on the curved armpit junction itself.
- Measure straight across from the fabric edge on one side to the fabric edge on the other, not the seam stitching. Seams can pull the tape narrower than the actual fabric width, so always read from where the material ends.
- Take the measurement twice, and if the two readings differ by more than a few millimetres, do it a third time and go with the average.
- Write the number down in both inches and centimetres so you’re not converting under pressure later.
Pro Tip: Measure the same shirt on two different days if you can. Humidity and how flat the fabric has relaxed can shift a reading by a few millimetres, and averaging across sessions gives you a more honest number than a single rushed measurement.
This whole process takes about two minutes once you’ve done it a couple of times, and it’s the same process whether you’re measuring your own wardrobe or double checking a listing before you buy.
Turning your pit to pit number into a size decision
A pit-to-pit reading only tells you half the story until you convert it. The number you get with a tape is the flat, front-panel width, so you need to double it to estimate the garment’s full chest circumference. A shirt with a 20 inch pit to pit measurement roughly corresponds to a 40 inch chest circumference. That’s the shirt’s total room, not your body’s exact size, and that’s where ease comes in.
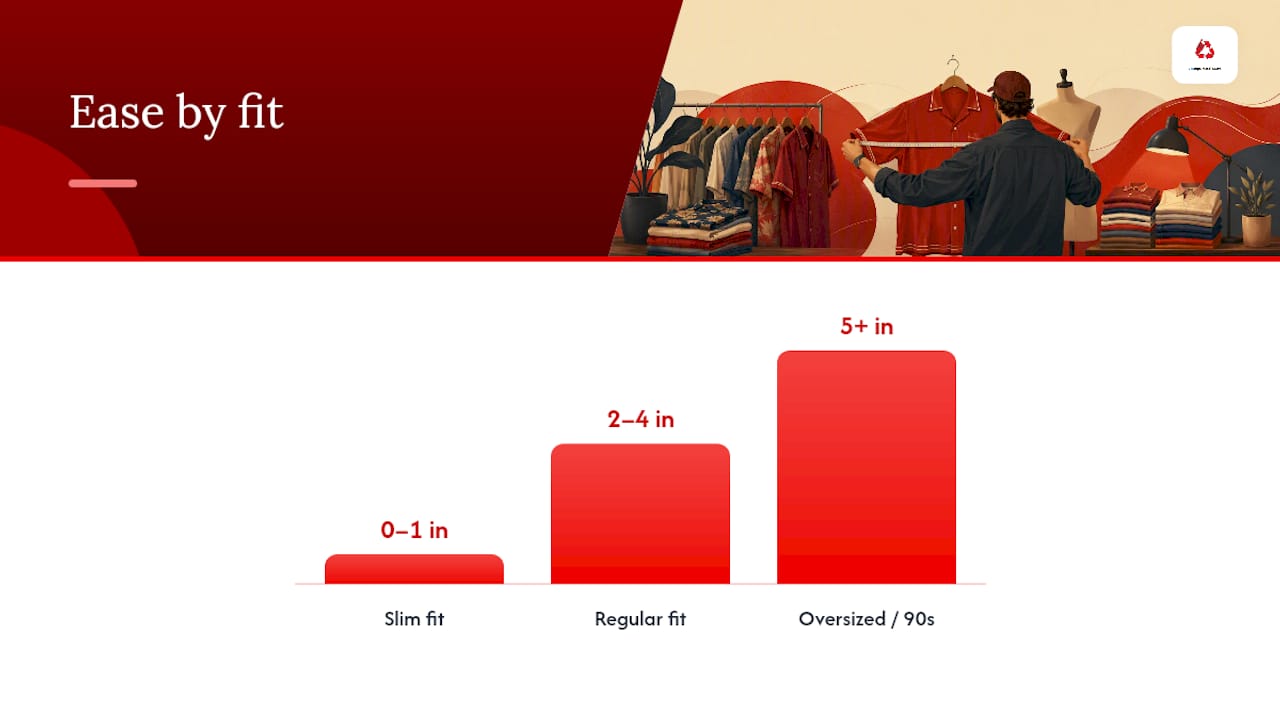
Ease is the breathing room built into a garment beyond your actual chest measurement, and how much you want depends entirely on the fit you’re after:
- Slim fit: roughly 0 to 1 inch of ease over your actual chest measurement
- Regular fit: roughly 2 to 4 inches of ease, which is the comfortable middle ground most people default to
- Oversized or boxy 90s fit: 5 inches or more, which is exactly the room those classic loose tour tees were cut with
A few things push that ease number around. Heavier cotton, like the thick single-jersey used on a lot of 1990s tour merch, drapes differently to a thin modern tee and can feel roomier than the raw number suggests. Fabric that’s prone to shrinkage will tighten up after a wash or two, so build in a little extra room if you plan on washing it hot. And if you’re layering the shirt over another top, add ease on top of ease.
The single best trick, though, has nothing to do with maths. Grab a shirt already in your wardrobe that fits the way you want this new one to fit, lay it flat, and measure its pit to pit. Compare that number directly against the listing. No conversion, no guesswork, just a straight match.
The measuring mistakes that lead to a returned shirt
Most sizing disappointments trace back to one of a handful of avoidable errors, and every one of them is fixable once you know what to look for.
- Measuring on a soft surface. A bed or couch lets the fabric sink and distort, giving you a narrower reading than the shirt actually has. Always measure on something firm and flat.
- Panels not aligned. If the shirt is twisted or one side is pulled tighter than the other, your number will be skewed. Line the seams up before you touch the tape.
- Seam-to-seam instead of fabric edge. Measuring the stitching rather than the outer edge of the fabric can shave a surprising amount off your number.
- Mixing units without converting properly. A listing in centimetres and a wardrobe measured in inches is a recipe for a size mistake if you round carelessly.
- Trusting a single reading. One measurement can be off by human error alone.
On that last point, taking just one measurement is where most errors creep in. A second or third reading, averaged together, catches the small slips that a single pass misses, and comparing your result against a shirt you already own gives you a real world sanity check that no amount of careful tape work can replace on its own.
Pit to pit conversion cheat sheet
Once you’ve got your number, this table gives you a fast way to translate it into an estimated chest circumference and a rough size hint. Brand size labels vary enough that these should be treated as a guide, not gospel, and it’s worth allowing 1 to 3 inches of manufacturer tolerance either side.
Worked example: a listing gives a pit-to-pit of 57cm. Convert that to inches (roughly 22.4 inches), double it, and you land at a chest circumference of around 44.8 inches, sitting right in large territory on most charts. If you want a broader vocabulary of where other flat measurements are taken on a garment, like body length or sleeve width, a garment measurement guide covers the full set worth knowing.
Vintage-specific pit to pit advice from the crew who live in it
Vintage Metal Store has handled enough dead-stock tour shirts and second hand band tees to know that PTP behaves differently once a garment’s got some age on it. Era and cut change what “normal” ease looks like. A thin single-knit tee from the early 1980s often needs generous ease because those fabrics can feel tight the moment they’ve been through a wash, while a heavier 1990s tour shirt, cut boxier to begin with, usually runs roomier than its raw number suggests.
When you’re checking a listing or a shirt in hand, run this quick checklist:
- Measure pit-to-pit, then the shoulder seam width and total body length for the full picture.
- Note the fabric type and the era on the tag, since both shift how the PTP number should be read.
- Check listing photos for single-stitch hems, which usually point to genuine pre-1990s production.
- Look for pre-wash signs or shrink warnings from the seller before you commit.
For a deeper walk through of era-based cuts and fabric quirks, Vintage Metal Store’s vintage shirt sizing guide covers the detail this section only has room to summarise.
How do you measure a jacket or dress with pit to pit instead of a shirt?
The core method stays the same across garment types: lay it flat, smooth it out, measure 1 inch below the armpit, edge to edge. What changes is what that number actually tells you.
On a shirt or tee, pit-to-pit is your primary sizing signal because chest room is the whole game. On a jacket, the number matters just as much, but you need to account for what’s going underneath. A denim jacket or leather vest meant to sit over a tee needs more ease built into its PTP than a shirt worn on its own, because you’re layering, not just covering skin. Measure the jacket the same way, then mentally add a few extra centimetres of tolerance to whatever you’d normally accept for a standalone top.
Dresses and other garments with a more tailored bodice complicate things further, since the chest area often tapers into a fitted waist rather than hanging straight down like a tee. Pit-to-pit still tells you the room across the bust, but it won’t tell you anything about waist or hip fit, so treat it as one data point among several rather than the whole answer.
Sleeveless garments, like vests and tanks, need extra care because there’s no sleeve seam to anchor your 1 inch reference point. Use the point where the armhole curve begins instead, and take two readings to be sure you’re consistent from one side to the other.
Why stretch fabric throws your pit to pit number off
Stretch fabric is the one variable that breaks the whole pit-to-pit system if you’re not careful, because the measurement assumes the garment is sitting at its natural, relaxed width. A cotton blend with a few percent of elastane will happily stretch an extra inch or two under light tension without you noticing, and if you pull even slightly while measuring, your number comes back bigger than the shirt actually runs.
The fix is simple but easy to forget in the moment: lay the fabric out and let it settle for a minute before you measure, rather than smoothing it with any tension in your hand. Rest the tape on top of the fabric rather than pulling it taut against the garment. If you’re comparing a stretch tee to a rigid cotton tour shirt, don’t expect the same PTP number to translate to the same fit. A stretch shirt with a smaller PTP can still feel roomier on the body than a rigid vintage tee with a slightly larger number, simply because it’s got give the older fabric doesn’t.
This matters most when you’re cross-referencing a modern reproduction against a genuine vintage original. Most dead-stock and ex-tour shirts from the 1980s and 1990s are 100% cotton with zero stretch, so the flat measurement you take is close to the true, final fit you’ll get on your body. Treat any stretch percentage on a listing’s fabric content as a signal to add a little extra caution to your ease calculation, not to ignore the PTP number altogether.
Measuring pit to pit on a fitted tee versus a baggy vintage tour shirt
A fitted garment and a loose one demand the same measuring technique but a different reading of the result. On a fitted or slim-cut tee, the fabric sits close to the body with minimal excess, so the flat pit-to-pit number tracks closely with your actual chest measurement plus a small margin. There’s not much room for error here: even half an inch of extra ease changes how the garment sits noticeably, so take your two or three readings seriously and trust the average.
A loose or boxy garment, like the classic 90s oversized tour tee, gives you a lot more room to work with, and that changes what you’re actually checking for. The fabric often has extra width built in deliberately, sometimes drop shoulders or a wider body cut that isn’t meant to hug anything. When you measure a shirt like this, you’re less concerned with precision to the millimetre and more concerned with confirming it’s in the right ballpark, because a couple of centimetres either way won’t change how the shirt wears.
The practical difference shows up when you’re deciding whether to size up or down on a listing. For a fitted style, err on the side of a slightly larger PTP if you’re between two numbers, since a fitted garment that’s too small is unwearable while one a touch roomy still works. For a loose style, you’ve generally got more forgiveness either way, which is exactly why so many collectors default to boxy vintage cuts when buying second hand without trying anything on first.
A publisher’s note on why this number matters
Every listing we put together at Vintage Metal Store gets measured by hand, because a mislabelled tag from 1994 tells you nothing useful on its own. Getting the pit-to-pit number right, and being upfront about it, is the difference between a collector trusting a second hand purchase and hesitating on it. If you want the full picture on era-specific cuts before you commit to a purchase, our band shirt sizing guide walks through exactly how we measure and record every item that goes up for sale.
— David
Find your next shirt with the fit already sorted
Vintage Metal Store is the alternative to blind guessing on second hand sizing. Every listing carries its own hand-measured pit-to-pit figure, so you’re never relying on a size tag from three decades ago that was never accurate to begin with. That means less back and forth, fewer returns, and more confidence hitting “buy” on a rare piece.

Take the Rare Metallica 1992 Tour Tee as an example. The listing gives you the exact flat measurement up front, so you can run it against your own wardrobe before you commit. Browse the full range of vintage Metallica shirts for more PTP-listed options, or drop us a line if you want the exact numbers on a piece before you check out. Wear the legacy, and this time, know it’ll actually fit.
Sources
FAQ
What size is 22 inch pit to pit?
A 22 inch pit-to-pit measurement doubles to roughly a 44 inch chest circumference, which typically sits in large to extra-large territory depending on the brand’s own chart.
How do you measure pit to pit?
Lay the garment flat on a hard surface, smooth out any wrinkles, and measure straight across from fabric edge to fabric edge, about 1 inch (2.5cm) below the armpit seam rather than on the seam itself.
What size is 57cm pit to pit?
57cm converts to roughly 22.4 inches, which doubles to an estimated 44.8 inch chest circumference, generally landing in the large size range.
What size is 17 pit to pit?
A pit-to-pit measurement doubles to an approximate chest circumference, which usually corresponds to a small or youth/junior size depending on the cut.
Recommended


