


TL;DR:
- Assess the condition of vintage band shirts before restoring them to prevent damage.
- Use gentle, condition-matched cleaning methods, focusing on preservation rather than aggressive washing.
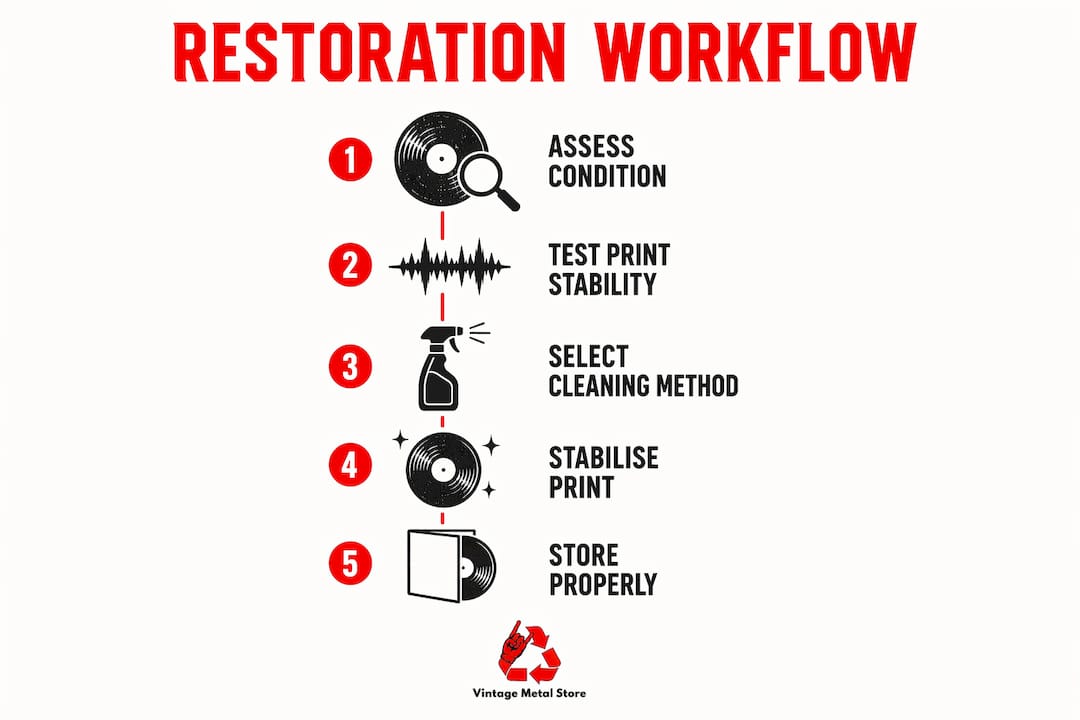
A successful restoring old band shirts workflow is defined by one rule: assess the condition first, then choose your method. Skip that step and you risk turning a rare 1990s Metallica tour tee into a pile of flaking ink and stretched cotton. The good news is that most vintage band shirts respond well to careful, non-invasive care. The key is matching your technique to the shirt’s actual state, not applying a one-size-fits-all wash cycle and hoping for the best.
What is the restoring old band shirts workflow?
Experienced restorers divide treatments into three clear tracks: dry maintenance for intact prints, spot-dampening for localised stains, and storage-led stabilisation when cracks or lifting are already present. This framework comes from textile conservator practice and applies directly to vintage band tees. Each track demands different tools, different handling, and a different definition of success. Understanding which track your shirt belongs to before you touch it is the single most important decision in the whole process.
How do you inspect a vintage band shirt before restoration?
Inspection is the foundation of every good band shirt restoration. Hold the shirt up to light to detect hairline cracks, stiffness, or edge lifting in the print. These signs tell you the ink is already fragile, and any agitation or moisture will accelerate flaking.
Here is what to check during your inspection:
- Print surface: Look for hairline cracks, bubbling, or areas where the ink has begun to separate from the fabric.
- Fabric integrity: Check for thinning, pilling, or holes around the collar, armpits, and hem.
- Odour: Smell the shirt carefully. Musty or chemical odours suggest storage damage that needs addressing before any cleaning.
- Colour stability: Dampen a cotton bud and press it gently against a small, hidden area of the print. If colour transfers, dye-bleed risk is high and wet cleaning is off the table.
- Label condition: Original labels confirm authenticity and can indicate fabric composition, which affects how the shirt responds to moisture.
Pro Tip: Run your fingernail very lightly across the edge of the print. If tiny flakes lift off with almost no pressure, treat the shirt as fragile and skip all wet methods entirely.
If the print passes the light test and the dye test, you can proceed to gentle wet cleaning. If it fails either, move straight to dry maintenance and storage-led stabilisation.
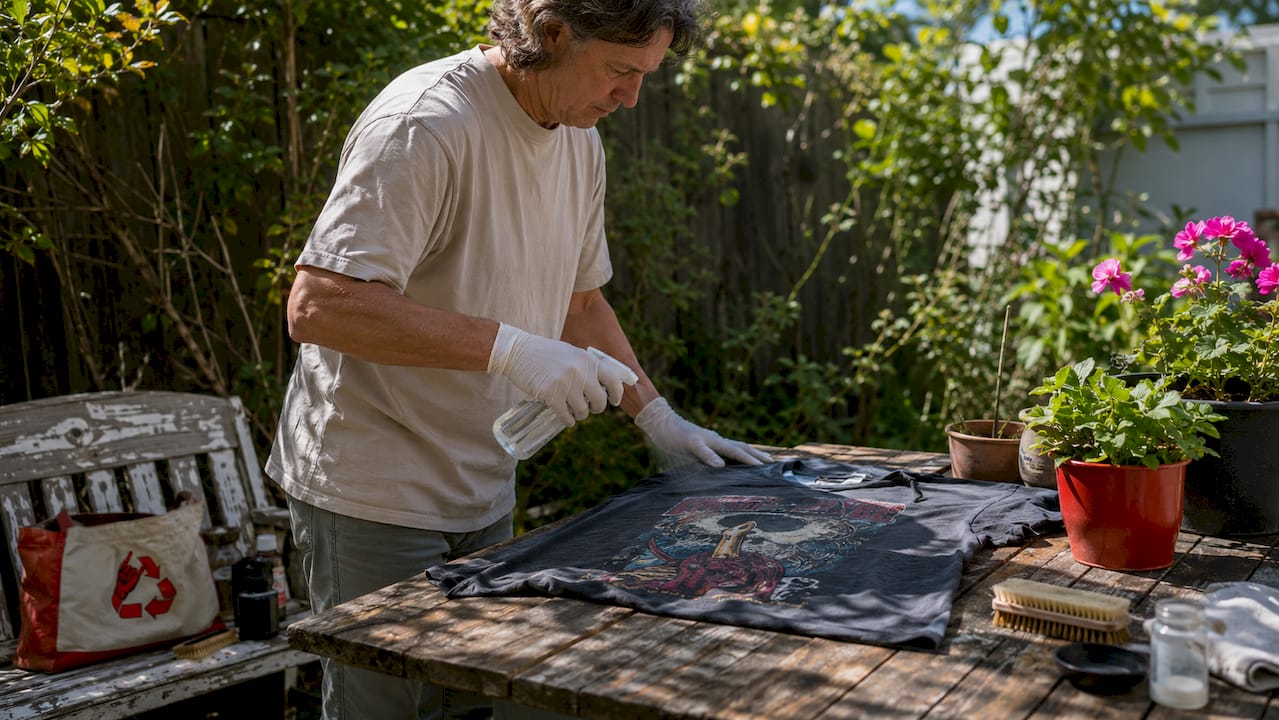
How to clean band tees safely without wrecking the print
Safe cleaning of vintage band shirts with intact prints follows a strict sequence. Cold water at or below 30°C, a pH-neutral enzyme-free detergent, and a gentle cycle or hand wash are the non-negotiables. Every shortcut you take here compounds over time.
Follow these steps for a safe wash:
- Turn the shirt inside out. This puts the print face against nothing, reducing friction during the wash.
- Place it in a mesh laundry bag. The bag limits agitation and prevents the shirt from tangling with other items.
- Use cold water only. Heat is the primary cause of plastisol ink microfractures. Never exceed 30°C.
- Choose a pH-neutral, enzyme-free detergent. Products like Woolite or similar gentle formulas work well. Avoid anything with bleach, optical brighteners, or fabric softener.
- Select the gentlest cycle available, or hand wash. Machine washing creates 63% higher flaking rates compared to hand-soaking. That number alone should settle the debate.
- Air dry flat on a clean towel. Never tumble dry. Never iron directly on the print. Heat at the drying stage undoes everything you protected during washing.
For odour removal without a full wash, indirect sunlight for 2–3 hours combined with a light mist of one part white vinegar to three parts distilled water on the reverse side works well. Apply the mist to the inside of the shirt only, never directly onto the print. Alternatively, seal the shirt in a bag with baking soda or activated charcoal overnight. Both methods adsorb odours without introducing moisture or chemical stress to the ink.
Pro Tip: Never pour vinegar directly onto a print, even diluted. The acidity can soften plastisol ink over repeated use. Keep it to the reverse side and use it sparingly.
How do you stabilise vintage shirts with cracked or lifting prints?
When a print is already cracked or lifting, the goal shifts completely. You are no longer trying to clean the shirt. You are trying to stop the damage from getting worse. Wet cleaning accelerates deterioration on cracked prints, so it is removed from the workflow entirely.
The comparison below shows the difference between the two approaches:
| Situation | Recommended Approach |
|---|---|
| Print intact, no cracks | Cold gentle wash, pH-neutral detergent, air dry flat |
| Minor surface dust or light soil | Dry brushing with a soft natural-bristle brush |
| Cracked or lifting print | Dry maintenance only, no moisture, acid-free tissue storage |
| Persistent odour on fragile shirt | Baking soda encapsulation or activated charcoal in sealed bag |
| Severe delamination or structural damage | Consult a professional textile conservator |
Dry brushing with a soft natural-bristle brush removes surface dust without introducing any moisture. Handle the shirt as little as possible. When you do handle it, support the full body of the shirt rather than gripping it by the print area.
“Restoration prioritises stabilising existing damage rather than reversing cracks, which requires adjusting care to avoid accelerating flaking.” — Reviving Vintage Band Tees with Cracked Prints
Avoid applying any adhesive, sealant, or iron-on product to a cracked print. These treatments often yellow over time, trap moisture beneath the ink layer, and cause further delamination. If the shirt is a genuinely rare piece, a professional textile conservator is worth the investment. Museum conservators use dye transfer tests and pH management to decide whether any cleaning is feasible at all.
What is the best way to store vintage band shirts long-term?
Long-term preservation benefits most from a controlled storage environment rather than repeated cleaning cycles. The way you store a shirt after restoration determines how long your work lasts.
Key storage principles for vintage band shirts:
- Fold, do not hang. Hanging causes shoulder stretching and puts constant tension on the fabric. Fold shirts with the print facing inward and store flat.
- Use acid-free tissue between layers. Interleaving with acid-free tissue prevents print-to-print abrasion and stops adhesive transfer between shirts stored together.
- Control the environment. Archival textile guidelines specify a cool, dark space with relative humidity below 45%. Fluctuating humidity is more damaging than consistently moderate humidity.
- Avoid sealed plastic bins. Plastic traps moisture and off-gasses chemicals that degrade both fabric and ink over time. Use acid-free boxes or breathable cotton storage bags instead.
- Inspect and rotate every six months. Periodic inspection catches new damage early. Rotating shirts prevents permanent fold creases from setting into the fabric.
The table below summarises ideal storage conditions:
| Parameter | Target Condition |
|---|---|
| Temperature | Cool, stable (15–20°C) |
| Relative humidity | Below 45% RH |
| Light exposure | None (dark storage) |
| Container type | Acid-free box or breathable cotton bag |
| Interleaving material | Acid-free or unbuffered tissue |
What are the most common mistakes in the band shirt restoration workflow?
Most damage to vintage band shirts happens during restoration attempts, not during storage. Knowing what to avoid is as useful as knowing what to do.
- Over-washing: Every wash cycle stresses the fabric and ink. Brittle plastisol inks do not tolerate repeated washing. Shift your focus from cleaning to preservation as the primary care strategy.
- Wrong water temperature: Hot water causes immediate and irreversible ink cracking. There is no recovery from a hot wash on a fragile vintage tee.
- Ironing the print directly: Even low heat applied directly to a plastisol print causes it to soften, stick, and tear. Always use a pressing cloth or iron only the reverse side.
- Applying commercial fabric treatments: Starch sprays, fabric softeners, and waterproofing treatments all introduce chemicals that interact unpredictably with aged inks and dyes.
- Ignoring odour until it becomes structural: Persistent odour often signals mould or mildew. Catching it early with baking soda or sunlight exposure prevents the biological damage that follows.
- Skipping the dye test: Washing a shirt without testing for dye stability first can cause colours to bleed into each other, permanently altering the print’s appearance.
Pro Tip: If you are unsure whether a shirt can handle any moisture at all, treat it as fragile. The cost of being too cautious is a shirt that stays slightly dusty. The cost of being too aggressive is a shirt with no print left.
Key takeaways
A successful vintage band shirt restoration depends on condition assessment first, then matching your cleaning or preservation method to what the shirt can actually tolerate.
| Point | Details |
|---|---|
| Inspect before anything else | Check for cracks, dye bleed, and fabric integrity before choosing any method. |
| Match method to condition | Intact prints tolerate cold gentle washing; cracked prints need dry maintenance only. |
| Odour removal without water | Use baking soda, activated charcoal, or diluted vinegar mist on the reverse side. |
| Storage is the real preservation | Acid-free tissue, cool dark environments, and flat folding extend shirt life far longer than cleaning. |
| Avoid heat at every stage | Hot water, tumble drying, and direct ironing are the three fastest ways to destroy a vintage print. |
What i have learned from years of handling vintage metal tees
The biggest mistake I see collectors make is treating restoration like a cleaning problem. It is not. Most of the time, the shirt does not need to be cleaner. It needs to be safer.
I have handled shirts from early 1980s Iron Maiden tours and mid-1990s Pantera runs, and the ones in the best condition are almost always the ones that were stored well and washed rarely. The ones with the most damage were washed too often, hung on wire coat hangers for years, or stored in plastic bags in a garage.
My honest advice is to run the dye test every single time, even on shirts you have washed before. Dyes behave differently as they age, and a shirt that was stable two years ago may bleed today. Small tests cost nothing. Replacing a ruined print costs everything.
Embrace the imperfection, too. A hairline crack in a 1992 Metallica tour print is not a flaw. It is evidence. It tells you that shirt was actually there. Chasing a perfect-looking vintage tee often means over-restoring it into something that no longer looks or feels authentic. The goal is preservation, not perfection.
— David
Find rare vintage band shirts at vintage metal store
If you are serious about reviving vintage band tees, starting with a shirt worth restoring makes all the difference. Vintage Metal Store carries authentic ex-tour stock and deadstock from some of the most legendary metal tours ever staged.

Whether you are after a rare 1992 Metallica tour tee or want to browse the full Metallica vintage collection, Vintage Metal Store has pieces that reward careful restoration and proper preservation. Every shirt in the catalogue is a piece of metal history. Wear the legacy. Shop the collection at Vintage Metal Store today.
FAQ
How do i know if a vintage band shirt can be washed?
Hold the shirt up to light and check for hairline cracks or stiffness in the print, then perform a dye transfer test on a hidden area. If either test reveals fragility or colour bleed, skip wet cleaning entirely and use dry maintenance methods instead.
What detergent is safe for vintage band tees?
A pH-neutral, enzyme-free detergent like Woolite is the safest choice for washing vintage band shirts. Avoid anything containing bleach, optical brighteners, or fabric softener, as these degrade both the fabric and the ink over time.
Can you fix a cracked print on a vintage band shirt?
Cracked plastisol prints cannot be fully reversed at home. The correct approach is stabilisation: avoid all wet cleaning, handle the shirt minimally, and store it with acid-free tissue interleaving to prevent further flaking.
How should vintage band shirts be stored after restoration?
Fold shirts flat with acid-free tissue between layers and store them in a cool, dark space with relative humidity below 45%. Never hang vintage tees or store them in sealed plastic bins, as both methods accelerate fabric and print deterioration.
When should you see a professional textile conservator?
Consult a professional textile conservator when a shirt shows severe print delamination, structural fabric damage, or significant mould growth. Museum conservators use dye tests and pH-controlled methods that go well beyond safe home care.
Recommended


